Useful links and other resources
Links
Here is a collection of useful links that might help you develop better code and give some hints when stuck:
-
https://docs.opencv.org/4.x/d9/d61/tutorial_py_morphological_ops.html - Filtering out noise and amplifying interesting features.
-
https://www.geeksforgeeks.org/python/find-and-draw-contours-using-opencv-python/ - Finding contours of colored blobs.
-
https://docs.python.org/3/howto/logging.html - Basics of logging in Python.
-
https://docs.python.org/3/library/profile.html - If your code is running slow you should profile and investigate what takes time.
-
https://numba.pydata.org/ - If you want to make very performant algorithms in Python. This pre-compiles functions but takes some work to get things working and plays hard with external libraries.
How to Git - intro
Git is a useful versioning tool we use during the whole course. There are some useful patterns to know before you start the robot project to avoid pitfalls and make everyone’s life a little bit easier.
Overall I suggest ot use an IDE when working with Git, not the command line interface. Visuals provided by and IDE makes navigating in the project a lot simpler. Command examples below are provided as commands, but they are identically named inside an IDE.
How to Git - basics
Git consists of the following elements:
-
Repository - A Git repository can be identified by the .git folder in the root of a directory. It tracks the changes of all files done in the project. These changes are contained inside branches. Branches can diverge and contain changes different changes to the same file. A Git repository contains a local and remote component. Can be created using
git initor when using a remote repository
git clone git@github.com:ut-robotics/picr-docs.gitthe status of a repository can be checked using
# Get status git status #On branch .... #Your branch is up to date with 'origin/...'. #Get git history log git log # commit b8cbbff7c8f260a18373e2cc121708d3a5b8a21d (HEAD -> ..., origin/...) #Author: ... -
Local Repository - part of the Repository that resides in your file system. It can be synced with the remote Repository.
-
Remote Repository - part of the Repository that resides off-site in another server. Local changes can be pushed to and remote changes can be pulled from a Remote Repository. Useful commands when working with a remote repository:
git pull # pulls remote changes from a repository git fetch # downloads objects and refs from a repository git push # updates objects and refs in a remote repository -
Commit - a snapshot of all staged changes in the working directory. Staged changes are everything that is to be commited. Unless pushed to a remote repository a commit present only locally. Every commit must include a meaning ful message explaining the changes done.
# we add all changed files and commit the changes
git add -A && git commit -m "A reasonable and meaningful message"

# git push REMOTE-NAME BRANCH-NAME
git push origin master # pushes the changes to the 'master' branch in 'origin'
Sometimes there is a need to remove files from a repository. This can be done so:
git rm bad_file git commit -m "Remove bad_file" git push -
Git ignore - some files, like local configuration files or files containing secrets should not be commited. To enforce this it is possible to define a .gitignore file that makes said objects invisible to git. In our course we have multiple folders with different contents. It is good to have separate .gitignore files to limit the scope of changes to said folders.
echo venv/ >> software/.gitignore # ignores the contents of software/venv echo *.log >> .software/gitignore # ignores all files with the *.log suffix # The file can be edited with any text based editor or IDE tools -
Branching - allows you to create separate lines of development in your repository. Branches have an origin point and can be later joined back to the main branch. Branches, like commit messages, must have meaningful names.
# Creating a branch. Remember to be in the branch you want to merge into later (eg. software) git branch follow_ball # Switch to a branch git checkout follow_ball # Create and switch to a branch git checkout -b follow_ball -
Reverting to a previous commit - all commits are assigned unique ID-s. If there is a need to roll-back changes, this can be done using the checkout command. Some examples follow:
# Checkout a previous commit git checkout a0f81fkaq # the ID hash of a commit # If you want to delete all local changes with the rollback git reset --hard a0f81fkaq # If you want to keep current changes safe you can stash them git stash git reset --hard a0f81fkaq git stash pop # At this point a merge conflict is possible # If you want to restore a file to a previous commit git restore --source=a0f81fkaq -- software/important_code.py -
Merge conflicts - happen when Git can’t automatically patch changes from two sources. This usually happens when two branches edit the same file or when the source of a patch has changed. They need to be resolved manually to decide what state of the change is correct. Usually an IDE provides tools to resolve them.
Basics can be read up on here: https://git-scm.com/doc or utilize some good old search-engine-fu.
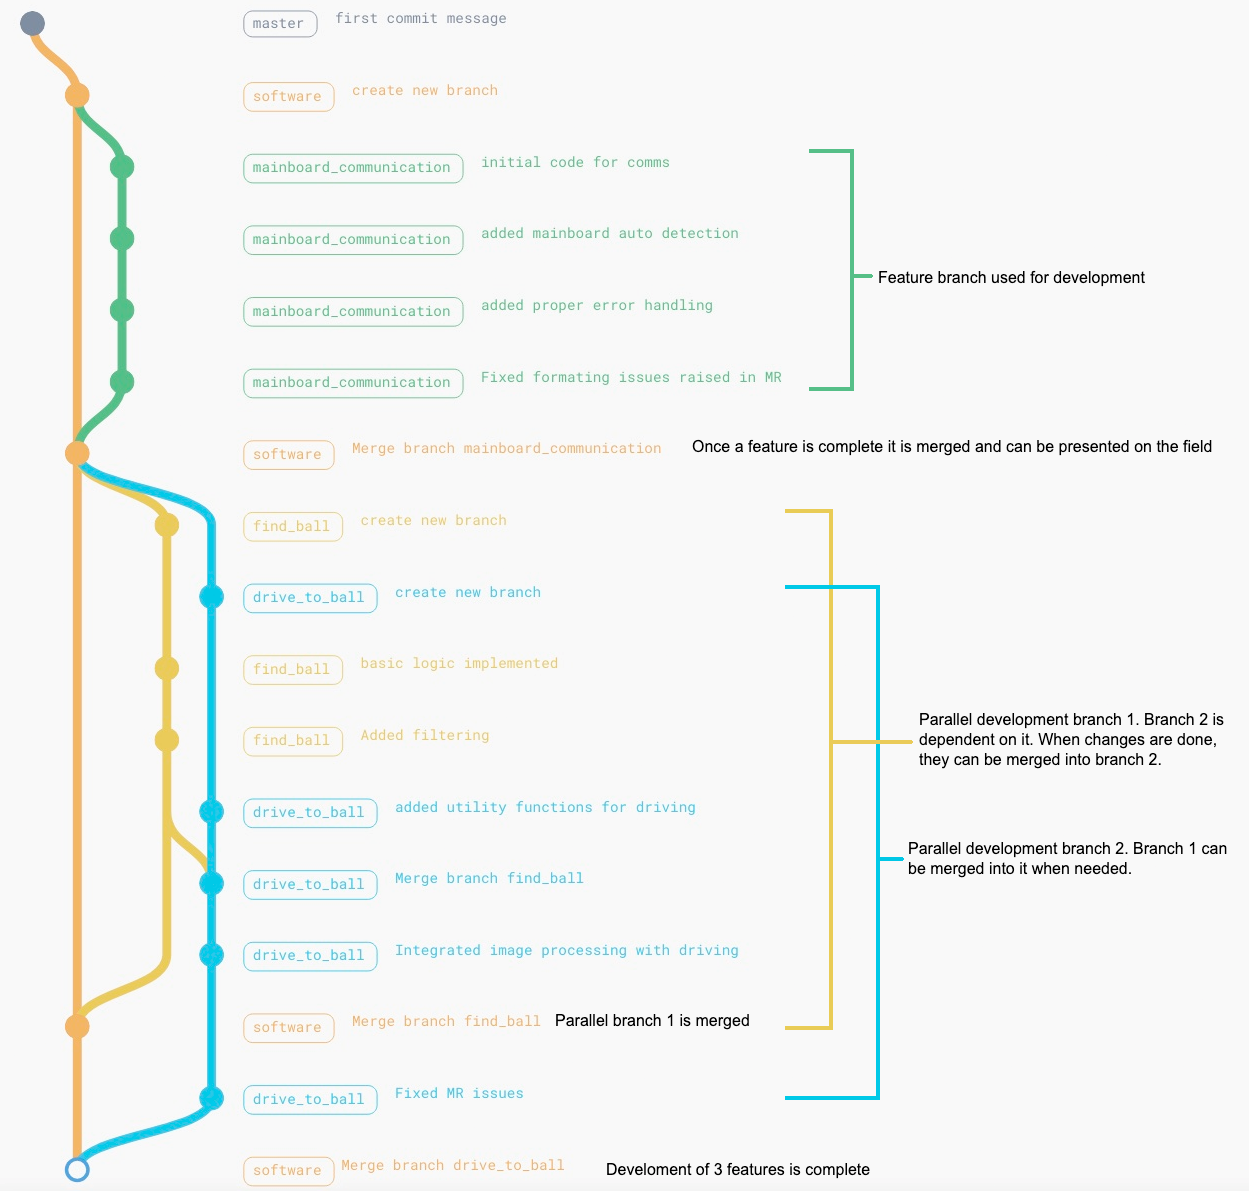
How to Git - Feature branches
We prefer to use a version of feature branches (https://www.atlassian.com/git/tutorials/comparing-workflows/feature-branch-workflow). This Git versioning workflow utilizes feature branches from the main branch where development takes place. Once a feature is complete, it can be merged back to the branch.
This approach allows to encapsulate changes, isolating them from each other. In this way the scope of a merge request is limited and makes reviewing them easier.
TL;DR: Git feature branch advantages and disadvantages:
+ Positives +
-
Scope of changes is encapsulated
-
Main branch is not poisoned by broken development commits
-
Simpler to review merge requests due to smaller scope
-
Easy to see what is currently in development by branches
-
If combined with Git rebasing keeps the main branch Git history clean from development commits
- Negatives -
-
Multiple feature branches on the same code can get messy
-
Some management overhead
A visual example how development would look like:
How to Git - Advanced stuff
When doing more specific things with Git there are some interesting concepts:
-
Differences between merging and rebasing
Merge: Combines two branches by creating a new “merge commit” that joins their histories. The history stays branched and shows all the separate work.
Rebase: Moves (or “replays”) your changes from one branch on top of another branch, rewriting history to make it look like all work happened in a straight line.
Both actions result in the same end set of Objects. The difference is in the Git history. Merging keeps all branch history and shows the merge point. Rebasing creates a cleaner, linear history by “reapplying” commits.
Pseudocode examples and ideas
Here you can find some simple algorithms that might help you in writing code for your robot.
Finding interesting objects
Here is some pseudocode that describes a way to find objects with segmented data and how one could filter out noise or invalid objects.
# We take 2 arguments:
# segmented_frame: only our interested color segmented out data
# unfiltered_segmented_frame: contains all colors segmented out data
def find_objects(segmented_frame, unfiltered_segmented_frame):
    # Filter out noise and transform raw segmented frame
    segmented_frame = morphology(segmented_frame)
    # Find contours from processed segmented frame
    contours = find_contours(segmented_frame)

    found_objects = []

    for contour in contours:
        if contour.size < MIN_OBJECT_SIZE:
            continue

        obj_x, obj_y = contour.get_centre_coordinates()

        obj_size = contour.get_size()

        if obj_size < MINIMUM_SIZE:
            # Object is smaller than minimum threshold
            continue

        # we convert the pixel values to a normalized range between 0.0 and 1.0
        normalized_x = normalize(obj_x, 0, FRAME_SIZE_X)
        normalized_y = normalize(obj_y, 0, FRAME_SIZE_Y)

        # Different filters to sort out invalid objects
        if normalized_y < 0.05:
            # Object in the top 5% of the frame. Implausible to be of interest
            continue

        # ADVANCED FILTERING START

        # Analyze what pixels are between the object and center of the frame
        # Find the color sequence of pixels between 2 points in the frame
        line_sequence = get_line_color_sequence(
            unfiltered_segmented_frame,
            FRAME_SIZE_X/2,
            FRAME_SIZE_Y,
            obj_x,
            obj_y)

        if FORBIDDEN_SEQUENCE in line_sequence:
            # We found a forbidden sequence in the line data. Object most likely behind a line
            continue

        if invalid_pixel_percentabe_below(obj_x, obj_y) > INVALID_PIXEL_THRESHOlD:
            # We found too many wrong/non-orange pixels below the object. It most likely is not on the playing area
            continue

        # ADVANCED FILTERING END

        found_objects.append(TrackedElement(obj_x, obj_y, obj_size))

    # Sort the found objects based on a metric
    found_objects.sort()

    return found_objects